Its technical, Its bliss.... So here is Technical Bliss....

Technical Bliss is now MeetArpit.com


I have decided to move my blog Technica Bliss to a new domain MeetArpit.com.
You have loved Technical Bliss and provided a lot of support to it. I hope this blog will live upto the expectations of my readers.
>> Read comments | Add to Technorati | Suscribe to feed | Skip to the Top <<


By Arpit On Tuesday, July 17, 2007 At 9:08 PM

Lonely Couples. Wordpress Theme with Web 2 efftect


Lonely Couples is a golden Brown theme for Wordpress with web 2.0 effects.
It has following features.
  • Sidebar Widget Compatible
  • 2 Column Theme
  • Great color combination and Web 2.o effect in buttons .
  • Page Template for Archives Page
  • Page Template for Links Page
  • Automatic Top Navigation
  • 404 error page
  • Recent Post
This theme is created by WP Theme and sponsored by me :P

Here is the preview of the theme.


Technorati Tags:, , , ,

Labels: , ,

>> Read comments | Add to Technorati | Suscribe to feed | Skip to the Top <<


By Arpit On Wednesday, May 09, 2007 At 3:07 PM

Add Twitter to MyBlogLog Profile


Now you can add Twitter to your MyBlogLog profile.


To add twitter just log into you MyBlogLog account and click the link add twitter near your profile pic.

Thanks MyBlogLog for that nice utility.

Read more about this on MyBlogLog blog.

Technorati Tags:,

Labels: ,

>> Read comments | Add to Technorati | Suscribe to feed | Skip to the Top <<


By Arpit On Saturday, May 05, 2007 At 9:04 PM

Digg Dvd Hex code controversy continues


Now everyone knows the controversy about the hex key 09 F9 11 02 9D 74 E3 5B D8 41 56 C5 63 56 88 C0
If you still don't know about it, then read it here.

The information which They tried to suppress is now every where on web. Just have a look.

1# On T-Shirts:


You can get it for few $$.

2# In Poems:
Read this very funny poem .

BTW, how do you like my new poem? All numbers and preceding them uppercase letters are entirely accidental.

there were 09 planets
in the solar system
Fucking 9 planets
not 11
and not 02
but exactly 9 Damn planets
right in the middle
and everyone seemed happy

until 74 professors
meet on the conference
and started to wonder:
"we should have Exactly 3 planets
in our system" – proposed one
other opposed:
"regarding number of planets,
my colleague's idea with 5 Bothers me a little
shouldn't we make them Deliberately 8?"

41 professors liked the idea,
but 56 voted against it.
the revolutionists mobilized their base
and Called 5 scholars who couldn't come
to ask about their opinion
and couple more sent their votes via e-mail
at the end 63 votes for the change
and 56 were still against it

"nnow wwhen wwe hhave oonly 88 pplanets
wwhih oone sshould wwe rremove?"
- asked the stammerer
"pluto" – their all agreed.
there was no point in keeping this planet
disney stopped paying for the product placement
years ago

but the point is – how many normal people
they asked? people from different Countries? 0.
shame on them. let's go and watch a movie.


3# Domains:
Domain 09f911029d74e35bd84156c5635688c0.eu contains it all


And domain 09f911029d74e35bd84156c5635688c0.us redirects to a page which contains this sticker


4# Funny Images:
WWW is poured up by graphics like:


Thanks Philipp

Technorati Tags:, , , ,

Labels: ,

>> Read comments | Add to Technorati | Suscribe to feed | Skip to the Top <<


By Arpit On Thursday, May 03, 2007 At 2:46 PM

Change your MyBlogLog Widget Style


You can change the looks of MyBlogLog Recent Readers Widget by editing the CSS of your blog. AU Interactive blog has given the code to modify the blog CSS and give your MyBlogLog widget a dashing looks. The theme is available in two colors (for dark and light background).

To modify the MyBlogLog widget just insert this CSS code above your </head> tag.

Light theme:
<LINK REL=StyleSheet HREF="http://www.auinteractive.com/mybloglog/light.css" TYPE="text/css" MEDIA="screen">

Dark theme:
<LINK REL=StyleSheet HREF="http://www.auinteractive.com/mybloglog/dark.css" TYPE="text/css" MEDIA="screen">

You could remove the ‘View Reader Community’ and ‘Provided by MyBlogLog' links at the bottom by adding this to your CSS:

table#MBL_COMM td.mbl_fo_hidden {display:none;}

The source code of both the CSS are here:
CSS for Light Theme
CSS for Dark Theme

Thanks Markus and team for this.


Technorati Tags:, , , ,

Labels: , , ,

>> Read comments | Add to Technorati | Suscribe to feed | Skip to the Top <<


By Arpit On At 3:44 AM

Minimize Mozilla Firefox to system tray


Here is a small utility which will allow you to minimize Mozilla browser to your windows system tray. It also provides a right click menu for the tray icon.

You can also choose from three options:
1) Always minimize to the tray instead of to the taskbar.
2) Minimize to tray on close.
3) Require a double click to restore from the tray.

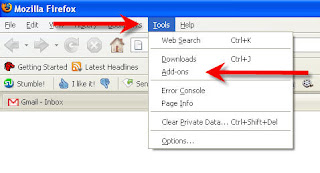
To get this feature enabled for Firefox, Install 'Minimize to Tray' Firefox Add-on from here.

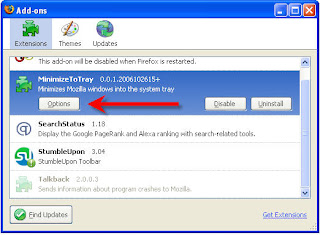
To customize this add-on, go to Tools menu of Firefox and the n click Add-ons.

Now select Minimize to Tray Add-on and click options.
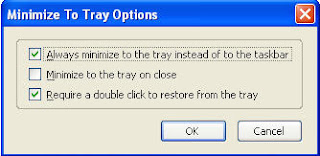

This will open the options window. Check the options you like.


Click ok and you are done. Now you can minimize your Firefox in system tray instead of taskbar.


Technorati Tags:, , , , , <

Labels: , , ,

>> Read comments | Add to Technorati | Suscribe to feed | Skip to the Top <<


By Arpit On Saturday, April 21, 2007 At 8:22 AM

How to Use Free Proxy with Firefox


Here is a complete Graphical tutorial for using Free Proxy with Firefox. By using a Proxy, you can browse internet anonymously. Also a proxy can be used for browsing blocked sites like Orkut and MySpace.

Step 1.
Find a list of free proxy. You can Google it out. One such list is here.

Step 2.
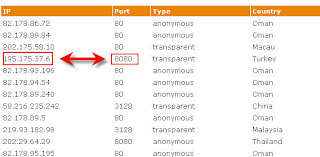
Now choose an IP address and port from this list. In this tutorial I have chosen IP: 195.175.37.6 and port: 8080. You can choose whatever you like.


Step 3.
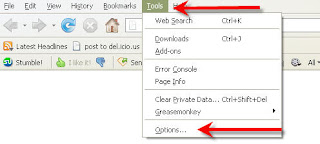
Open Firefox and in the menu choose Tools and then Options.


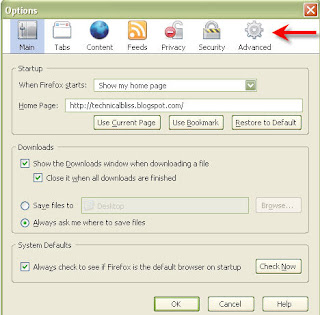
This will open the Firefox Options window. Click on Advance Options.


Step 4.
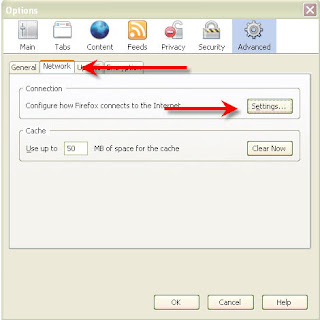
Click on Network tab and the click Settings button under Connection.


Step 5.
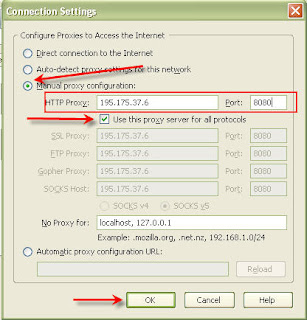
In Connection Settings window, click Manual proxy configuration. Now enter the IP address in HTTP Proxy and Port address in Port. ( In this example HTTP Proxy address is 195.175.37.6 and Port is 8080).
Also check the box 'Use this proxy server for all protocols'.


Click ok and your IP is set to desired Proxy.

You can use any online service to check your IP. Like check my IP is a site solely dedicated for this purpose. As you can see in the Screenshot below,my local IP is set to 195.175.37.6.


Technorati Tags:, , , , , <

Labels: , , ,

>> Read comments | Add to Technorati | Suscribe to feed | Skip to the Top <<


By Arpit On Wednesday, April 18, 2007 At 3:15 AM

Type in Hindi in Google Blogger Blogs


Now you can type and publish your blogpost in Hindi in your blogger blog. Google added the feature of English to Hindi translation in Blogger.
For example you can type 'Mera Bharat Mahaan' in Hindi. (My India is Great)

मेरा भारत महान

With this feature on, just type the word in roman script (as it is pronounced) and as soon as you hit space key or any puntuation button, the word will get translated to Devanāgarī characters.

Here is a brief tutorial of for using this feature in Blogger.

To turn on this feature, go into the Setting (Basic) of your blogger blog and select yes for the transliteration option. now save your settings.

Now start composing a new post. In the post editer screen, you will see a new button 'अ'. Click this button to enable composing in Hindi.
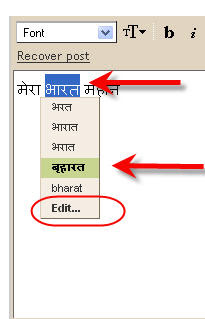
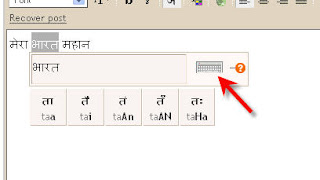
Now write the words as they are pronounce. As soon as you hit the space key or any punctuation key, the word will convert into Devanāgarī characters.

If you want to edit a word in Hindi, just click to highlight it with left mouse button and you will see a drop down menu. select the word from drop down menu or select the option 'edit'.

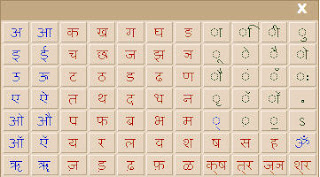
Clicking edit button in drop down menu will show an advance editor. this editor also has a keyboard button in the right.


If you click this keyboard button, an onscreen keyboard button will appear, with which you can type the desired word.


Some important points.

1) If you type a word in roman and the hindi transliteration which appears is not the one you wants, you can edit it using advance onscreen keyboard. This transliteration will be saved and next time when you will type the same word in roman, it will translated correctly based upon your previous edit.

2) This feature is avaliable on Internet Explorer 6 or higher and Firefox 1.5 or higher. Also this is available for Windows Operating System. Transliteration facility is unavailable in Mac OS.

3) This feature requires live internet connection. All transliteration are done on Google server and are sent back to your browser.

4) This features involves complex text layout which is not turned on in every browser. Internet Explorer has this feature turned on by default, while other browsers require support for complex text layout. This Wikipedia article gives detail help on how to turn it on in various OS.

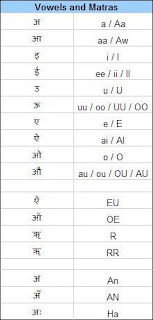
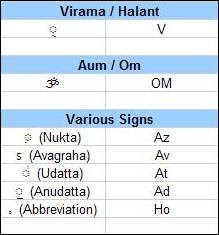
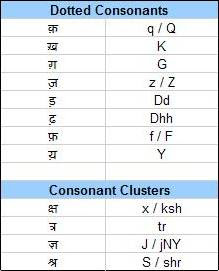
Here is the Devanāgarī-Roman Character Mappings:


Other help pages:
Blogger help on transliteration feature
Blogger help on Devanāgarī-Roman Character Mappings


Related Posts:
Create Drop Down Menu in New Google Blogger
Create Graph of your Feed Circulation
Add favicon to your Blog/Site
Blogger vs WordPress
23 Tips to Good Blogging


Technorati Tags:, , , , , , , , ,

Labels: , ,

>> Read comments | Add to Technorati | Suscribe to feed | Skip to the Top <<


By Arpit On Friday, April 13, 2007 At 7:09 AM


Technical Bliss is now MeetArpit.com


Email Subscription


    Whenever this blog is updated, you will get it in your mail box. Your email id is completely safe.

    Enter your email address:


    Add this blog to your technorati favorite.
    Add to Technorati Favorites

Previous Posts


Archives


My Reader's Community


Feed and Bookmarks

My Blogroll


Credits


    BLOGGER
    Original template design by Arcsin
    pingoat_11.gif


More Me

Blog Poll


© 2007 Technical Bliss | About Us

Disclamer:
All the tricks, tips and hacks provided on this blog are correct up our knowledge. We dont take any legal or moral responsibilty of the damage arising due to use of information provided here.


^Back to Top of this Page^


Creative Commons License
This work is licensed under a Creative Commons Attribution-Share Alike 3.0 License.