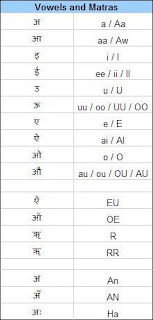
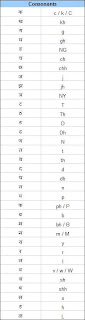
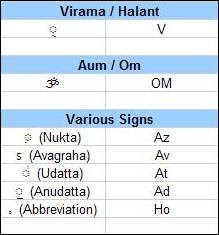
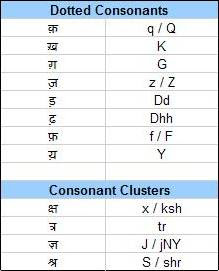
Now you can type and publish your blogpost in Hindi in your blogger blog. Google added the feature of English to Hindi translation in Blogger. For example you can type 'Mera Bharat Mahaan' in Hindi. (My India is Great)
मेराभारतमहान
With this feature on, just type the word in roman script (as it is pronounced) and as soon as you hit space key or any puntuation button, the word will get translated to Devanāgarī characters.
Here is a brief tutorial of for using this feature in Blogger.
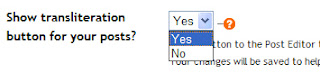
To turn on this feature, go into the Setting (Basic) of your blogger blog and select yes for the transliteration option. now save your settings.
Now start composing a new post. In the post editer screen, you will see a new button 'अ'. Click this button to enable composing in Hindi.

Now write the words as they are pronounce. As soon as you hit the space key or any punctuation key, the word will convert into Devanāgarī characters.
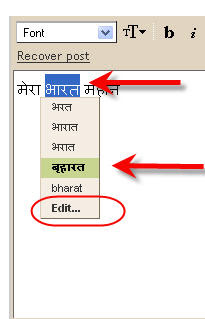
If you want to edit a word in Hindi, just click to highlight it with left mouse button and you will see a drop down menu. select the word from drop down menu or select the option 'edit'. Clicking edit button in drop down menu will show an advance editor. this editor also has a keyboard button in the right.
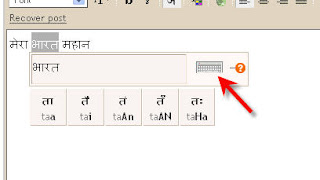
If you click this keyboard button, an onscreen keyboard button will appear, with which you can type the desired word.

Some important points.
1) If you type a word in roman and the hindi transliteration which appears is not the one you wants, you can edit it using advance onscreen keyboard. This transliteration will be saved and next time when you will type the same word in roman, it will translated correctly based upon your previous edit.
2) This feature is avaliable on Internet Explorer 6 or higher and Firefox 1.5 or higher. Also this is available for Windows Operating System. Transliteration facility is unavailable in Mac OS.
3) This feature requires live internet connection. All transliteration are done on Google server and are sent back to your browser.
4) This features involves complex text layout which is not turned on in every browser. Internet Explorer has this feature turned on by default, while other browsers require support for complex text layout. This Wikipedia article gives detail help on how to turn it on in various OS.
E-Mail Icon Generator is a small nice utility which creates a image icon of your email id. You can use this icon for providing your email address in your webpage or blog. This will certainly help you to avoid unnecessary spam. Some of the example icons are:
Email icon Generator provides the facility of icon generation for following email service providers: AOL ATT BellSouth Bigfoot Blueyonder Comcast Cox Earthlink Gmail Hotmail Live Lycos MSN Mac Netscape QQ RocketMail Rogers SBCGlobal Sina Spymac Sympatico Vip.Sina Verizon Yahoo
Update: 4:58 a.m. IST. Just now I have seen that Eric (One of the MyBlogLog Co-founder) has visited my blog and now He is member of my MyBlogLog Community. :) (just because of that automatic adding)
I have sent a message to Eric and am looking forward for some reply.
Update 6:52 a.m. IST. I have removed the code from my blog post. ____________________________________________
Here is a trick to increase your community members at MyBlogLog. Before I start to explain this trick, I would like to make some points very clear.
1) I am explaining this Trick just for the purpose of learning and fun. Do Not use this for spamming MyBlogLog. MyBlogLog is a nice place and its already facing a hell lot spam everyday. Eric and Folks are doing a great job by keeping that place clean, so please please and please help them in doing so.
2) I Do Not take any responsibility of use and accuracy of this trick.
So here we start.
What this trick will do? When any MyBlogLog member visits your blog, he will automatically joins your MyBlogLog Community.
Whats the Trick? Here it is explained.
Removed.. On request of MyBlogLog.
Result of this Trick Anyone who is logged in MyBlogLog and who comes to your blog/blogpost will automatically becomes the member of your blog community at MyBlogLog.
For example if you are logged in MyBlogLog and reading this post right now, you can check that you have become the member of my community.
So if you don't want to be the member of my community you can go at your MyBlogLog page and can leave my community.[Updated]
Suppose you are using Google Adsense in you blog/site and see some really interesting ad on you page, whose URL you want to know, OR you want to know the URL of an Ad because you want to block it, then don't click the ad. Clicking Ads on your own page is strictly against the Google Adsense Terms of Service (TOS). This may leads to termination of your Google Adsense Account.
To find out the landing URL of the ad unit, you can use either of the following two methods.
Method #1
a) Right click (not left click) on the ad title and select the option 'Copy Shortcut' (for Internet Explorer) or 'Copy Link Location' (for FireFox an Netscape).
b) Now open a text editor like notepad in your computer and paste the copied link in it.
c) Now the URL between 'adurl=' and '&' is the destination URL of the ad unit.
Now you can watch that site by pasting this URL in address bar of your browser. If you want to block the ads from this URL you can add this in you competitive filter list.
Update:Wendy Piersall shared an easy way to find the complete text URL of ad unit. Just right click the title of ad unit and go to 'Properties'. Now in the properties box try to select the address link with your mouse pointer and it will self scroll.
Now look for the URL between 'adurl=' and '&' to get the destination URL of ad unit. This method works both with Internet Explorer and Firefox.
You can use Google AdSense Preview Tool to know the URL of the ad unit. This tool works with Microsoft Windows Operating System.
To install this tool, right click here and save target in your computer.
The saved file is a registry file (.reg). Double click this file and click yes in the conformation message that appears.
Now here are the steps to find the destination URL of the ad unit using Google AdSense Preview Tool.
a) Open the page on which the ad is appearing in Internet Explorer. Right click on the page anywhere ( other than on ad unit) and select the option 'Google AdSense Preview Tool'.
This will launch the Google AdSense Preview Tool which looks like this:
b) Check the ad box whose URL you want to know and then click 'Show Selected URLs' option.
c) This will show you the URL of selected ad units.
Google Adsense is a very clean program which helps you to earn money with your site or blog. Through Google Adsense you can display the ads on your webpage/blog and earn some revenue. When a site/blog visitor clicks on these ads, Google pays you a particular amount which varies from few cents to as high as $15 (or even higher). Google also provides Competitive Ads Filter facility in your Adsense account through which you can block some particular website(s) to display there ads on your site/block. For example you can block Coke related ads on a site related to Pepsi or vice versa.
Now this Competitive Ads Filter can be used to increase your Adsense income. You can use this Competitive Ads Filter to block the low paying sites and MFA sites (Made For Adsense). This is 100% legal and is not against the Google Adsense Terms and Conditions. Low paying sites are sites which offer a very low amount per click. So blocking low paying sites will help you to increase your Adsense income substantially. MFA are the sites with content that is primarily made of Adsense ads or other advertisement systems like Amazon, eBay, Chitika, YPN, etc. Now when your site user clicks on ads of your site/blog (an MFA site ad), he will land on a page which don’t have any meaningful information but just a bulk of ads. This may destroy your site reputation. Also your readers may endup in not clicking the ads (as they know that the ads on you site do not tend to give them any help but a bunch of MFA)
How to use Competitive Ads Filter.
Step 1. First you have to get the list of sites (low paying and MFA) which you want to generate. To get this list use AdsBlackList.com. This is a site dedicated to create the list of such site related to the content and keywords of you site.
Go to this site here and in Demo column, fill the following information: URL: fill URL of your site or blog like http://technicalbliss.blogspot.com Keywords: Fill the keywords related to your site or blog. Category: Mark the categories you want to block form you Adsense ads. I would recommend marking both ‘low cost per click’ and ‘Made for Adsense’ Now click ‘Get Black List!’ Button. The list will be generated. (This may take some time, so have patience)
Step 2. Now when you have got the list of sites to be blocked, login to your Adsense account and go to tab ‘Adsense Setup > Competitive Ads Filter > Adsense For Content’.
Paste the list generated in step 1 in the box and click ‘Save Changes’ button.
And you are done with it. Google generally takes around 24 hrs to apply the changes.
This is a 100% legal way to boost your Adsense revenue. If you have any problem in using Google Adsense Competitive Ads Filter, feel free to ask me.
If you want to earn more money on internet, go read The University Kid. Jason has some awesome money making ideas and he share them for free. ENJOY.
If you own a website or a blog, it is always advisable to give you email id somewhere in it. You can provide it at ‘About Us’ page or at Contact page. Some times a curious reader may have some doubt or enquiries and in such case email is an excellent way to communicate. But while leaving your email id on a public page over the net, some precautions should be taken. This is because there are so many automated programs or robots that scan pages in search of email id. And once they find your email id, your mail box will be heavily spammed. Although email service providers; like Gmail are well equipped to protect your inbox from spam mails, but still why to take a chance?
Also you can use the following trick while leaving your mail id in the comment space of blogs or on public forums and message boards.
1# Instead of giving your mail id as xyz@abc.com give it as xyz[at]abc[dot]com. This is because most of the automated bots search for characters @ and . while scanning for email ids. So when you use this [at] and [dot] notation, your email id is only readable by human, not by computer programs.
2# On your website or blog you can display your image graphically by a small image. Like :
That’s my email id.:) The graphical display is a well known method and is followed by many sites in word verification or captcha verification.
11. RSS is must. Do have an RSS feed for your blog. Feedburner is the best option to burn your blog feed. A tech savy reader always prefers to subscribe the feed of blog. You just can’t ignore this feed thing.
12. Place RSS button at right place. Don’t slip the RSS button at the end of your page. Even providing it on your ‘About us’ page or on subscription page is not enough. Keep it in the side bar or some prime location of your blog. Instead of going for that single orange RSS button, you can provide buttons to some major RSS readers in the side bar of your blog. Also you can write a post about RSS, explaining what it means and how to use it and link it near the RSS button(s).
13. Offer email subscription of your blog. Not everyone is comfortable with RSS. Give the option to get your blog feed through email to your readers. FeedBlitz is one such popular service which provides such service. Also ensure your readers that their email address will be 100% safe and their privacy will be maintained if they choose to subscribe the service.
14. Full feed or partial feed? This is the question of your personal choice. You can provide an option of full feed with RSS ads supported in it, or can go for partial feed where readers will see the small snippet of your post and have to visit your blog to read the complete post. Choose whatever you feel better. You can also provide both options. Also if you are option for partial feed, make sure your readers click the link to read full post. Provide a snippet with good interest generating description.
15. Give relevant title to your post. The title of your post should be very relevant to the content of it. A reader should get a complete idea of what the post is all about just by reading title of it. Don’t forget that title creates the first impression about the post, and that counts. Also use titles like ‘100 Adsense-tips’ rather than just ‘Adsense tips’. Such titles always perform better.
16. Create a better URL of your blogpost. A good URL can help you a lot to rank better in search engines. Generally the post URL has format like http://www.blogURL.com/2007/02/10/blogpost_title. You can customize the blogpost_title part easily. Make sure you have your main post keyword is stuffed in the post title. Also avoid special characters like $ or % or = or & or + in the URL. Sometimes search engines spiders ignore the crawling of the pages whose URL contains these special characters.
17. Give proper credits. If you are quoting someone else, do provide proper credits. You can also give the links to the posts form other blogs, which are similar to your blogpost. This will help your readers to get better information over the topic. And trust me, if your blog is helpful to a reader, he/she will automatically return to it.
18. Link smartly. While providing a link in blogpost or side bar give good ‘Anchor text’. Suppose you are linking to someone’s post (or even you own post) about Adsense tips, then do not use text like click here or read it here. Instead use a descriptive text like ‘100 Adsense-tips’. Also you can use HTML tags like ‘target blank’ which opens the page in new window. Use such very wisely. You have to decide which page you want to get open in same window and which one in new window. Always remember that opening the link in same window will take the reader away from the current page. So be smart while linking.
19. Ping other sites. Whenever you update your blog, don’t forget to ping the other sites like technorati, icerocket Feedburner etc. The option of automatic pinging is available in many blog hosting platforms like Wordpress and Movable type. You can also use the services like Pingoat and Ping-o-matic to ping various sites on the net.
20. Tag you post properly. While posting on blog, always add your post to two to three relevant categories. Many search engines and services like technorati treats your categories as tags. Also adding technorati tags to your post is a good idea. Some nice technorati tags can bring a good deal of traffic to your blog. Don’t be over enthusiastic while tagging your post. Tag you post only with relevant tags. Over tagging may be considered as attempt to spam.
21. Provide bookmark options. Your blogpost must have an easy option to bookmark by the readers. Create the options like ‘digg this post’, ‘add to del.icio.us’ or ‘Furl it’. Also you can provide the same options for your entire blog (i.e. homepage) in the side bar.
22. Interact with your readers. Give a sincere and honest try to interact with your readers. After posting, just don’t sit back and wait for comments to flow in. Try to answer the readers’ comments. Sometimes a curious reader may like to mail you about some issue or some doubt, so give him/her an option to do so by providing your email id (do take some primary precautions while doing so).
23. Manage the comments. It is always advisable to turn on the comments moderation in your blog posts. It means that comments will always be published in blogpost after the approval of blog owner. Don’t tolerate a spammy comments, or comments intended for the purpose of promoting some other blog or sites. If you are hosting a blog on your own domain and webspace, add nofollow tag in you comment space and declare it properly on your blog. This will discourage the backlinks obsessed commenters. You certainly don’t want Google and other search engines to look at you blog comments space full of spam.
According to Technorati, there are more than 55 millions blogs registered on it. Your blog may be one of them. Now what makes the difference between handful of good blogs and remaining others? Here are some tips to good blogging. Mind you that these tips will not convert your blog into those best one. But still it will give you a good start.
1. Forget the default template. Looks matters. Try to customize your blog template. Don’t use one of the default templates provided by your blog host. It is always favorable to hire a professional designer for your blog template. But if you can’t afford to hire one, just take advantage of free templates available on net. Download them and give it a bit touch of yourself by adding some images, favicon, logo and colour scheme.
2. Mind the colour scheme of your blog. Just give a second thought to the colour scheme of your blog. Keep yourself in the shoes of your readers and then decide what colour you should opt for your blog. A shining bright colours may look attractive to teenage folks, but it may irritate some grown up mature readers. Also if you are blogging about some serious topic like politics, a simple eye-friendly colour scheme is suitable.
3. Optimize your post length. Avoid writing a long post. A standard blog post has 250-300 words. A very lengthy post always creates a chance to loose reader’s attention and hence affects the readership of your blog. If the post is long, try breaking it in parts. Instead of writing a long post titled ‘100 Adsense tips’, you can go for posts like ‘100 Adsense tips- Part 1’ and ‘100 Adsense tips- Part 2’
4. Avoid spelling and grammar mistakes. Always use spell check in your browser and have a proofreading of your post before publishing to avoid any spelling mistakes or grammatical error. Am not telling you to be hysterical about it, occasional typo or slips are ok, but a chain of errors may irritate your readers. You can use Microsoft word to type your posts, as it has a powerful inbuilt spell and grammar check.
5. Mind the fonts. Use simple and universally available fonts in your blog post. Everyone do not have all the custom fonts installed on their computers, so if you are using some whacky custom fonts in your post, what they will see is a standard font such as Arial or Times. Also choose the size of your font according to readership of your blog. If the readers are young or lower middle aged, you can use a small font size, but for upper middle aged or grown up readers, large font size is must.
6. Provide easy navigation. Encourage your readers to check the other posts of your blog. This will not only increase the page view count of your blog but also will lead you to get some loyal readership. Always provide links of some real good posts in the side bar. Also you can give ‘related posts’ links in the end of every post. Remember that people are lazy enough to explore a site or a blog on their own. Go up to the extent of spoon-feeding. Anyhow you have to make sure that they click other links on you blog.
7. Create a relevant Meta Data for your blog. Always create a relevant and well describing meta data (i.e. meta description, meta keywords etc) for your blog. Create separate meta data for you blog’s main page and post pages. Meta data helps in better indexing of you blog and blogposts in search engines. Also optimize you blog’s meta keywords for relevant one.
8. Page loading time. Try to decrease the loading time of your blog. The best way to decrease the loading time of the page is to check the widgets. Popular widgets like MyBlogLog and Flickr makes your blog look fancy, but they increase the loading time of the page. So optimize them properly. You can decrease the loading time of MyBlogLog widget by decreasing the number of visitors it shows. Also avoid embedded flash and multimedia elements in the page.
9. Post regularly. A regular update of your blog will attract Google bots and other search engines to your blog. Google loves the pages that are regularly updated. Its simple ‘Feed the bots’. This will certainly results in good search engine ranking. Also every time your readers visit your blog, they expect to find some new content in it. Don’t disappoint them.
10. Create unique content. The very basic rule of blogging is ‘Content is the King’. If your blog lacks good helping content, you will never get a long term readership. So try providing some original story. If there is some good news, try to be the first one or among the firsts to blog about it. Also keep your post focused on the topic. If you are blogging on a common topic, try providing atleast a point or two which appeals as new to the reader. Also if you create some real good new content, your chances of getting linked by other bloggers increase many folds. This will certainly bring a good deal of traffic to your blog and offcourse Google and Technorati juice.
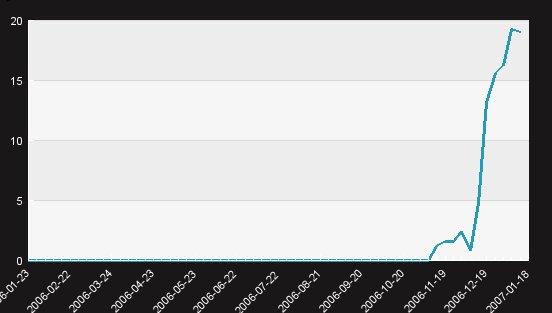
Open Source enthusiast Joost de Valk has used FeedBurner Awareness API to create a nice tool which gives a graphical analysis of your FeedBurner Feed circulation. Using this tool you can draw a graph of your number of your feed subscribers. The graph for my blog feed is shown below.
And yes you can subscribe the feed of Technical Bliss by entering your email id in the box below. Whenever this blog it updated you will get the post through email
There's a war going on in the blogosphere, and it has nothing to do with bloggers dissing each other on their respective websites. The war is about control of the blogosphere by several great, many good, and tons of terrible blogging platforms. The average newbie now has "too many" options to choose from, and the battle for blogging supremacy is hotter than ever.
At my website and blogs, I'm always asked the question "Is Wordpress better than Blogger?". The answer, of course, is "Yes". But to really understand why, it's important to look at both blogging platforms side-by-side and see which one you really need.
You also need to understand that there are different versions of Wordpress, the earliest now termed as "Wordpress" at http://www.wordpress.org, and the hosted version similar to Blogger now termed "Wordpress.com" which is of course available at WordPress.com
For Part 1 of this article, we look only at the self-hosted version of Wordpress. Here's the comparison scale:
1) Ease of Set-up And Use
Yes, it’s much easier to set-up a blog with Blogspot.com and get your own Bloggger account. You can be done in 10 minutes flat. Once you're set-up you can start posting immediately. If you want to add a designer's touch to your blog, there are also tons of blogger templates available for free.
Installing Wordpress however can be a major headache if you don't know what you're doing. Since you're going to host it on your own account, you'll need to download the installation files, upload them to your server, set-up a database, and run the configuration script.
However, if you know which hosting account to get, you can choose one with Cpanel included. With Cpanel, you can do a one-click installation, upgrade and removal of your Wordpress platform. There are tons of different hosting plans to choose from, so get one that fits your needs.
2) Customization & Advanced Use
Blogger doesn’t allow categories. You can’t sort your articles into different focuses, unless you know how to hack the platform. With Wordpress, not only can you add categories, you can also display each category differently on your main page. In fact with the correct plugins you can even turn your Wordpress into a magazine-like portal.
Publishing with Blogger can be a pain in the ass. It can take forever to post articles, especially if you’re making changes to the entire website. With Wordpress, publishing is much faster, although if you load your system with all kinds of bells and whistles it can be just as frustrating.
With a Blogger account, you can get additional features like "Shout Boxes" that improve interaction on your site. You can also get pretty themes and nifty little tools that you can add to the core template files. However, that's as far as you can go with Blogger.
With Wordpress however, the sky is the limit. As cliche as that may sound, not only can you get themes, additional "plugins" and advanced tools, you can also extend Wordpress to far beyond just a blogging platform.
The talk today is about using Wordpress as a complete, user-friendly Content Management System or CMS. Unlike complicated predecessors like PHPPostNuke, B2, Mambo or even Joomla, Wordpress is user friendly. Plus, the availability of source codes in this open-source system coupled with a strong community makes it possible to use Wordpress as an article management system, classifieds system, direct-selling site and even a paid membership site.
4) Copyrights and Ownership of Content
I started with Blogger and I won’t say that it’s bad. But after a while I started to get frustrated with Blogger, and here’s why: Google Owns Your Content
Google has the authority to shut down your account without warning if they don’t like what you’re blogging about. You don't have absolute control over your own blog. With Wordpress, you own the domain name and the blog is hosted on your own account. You have full control over your content.
With the self-hosted version of Wordpress (not Wordpress.com), you're free to write about anything you want, and use the software in any way you want. Yes, Blogger allows you to publish to your own domain, but they still own the database that holds your content! Don't forget that!
5) Search Engine Optimization and Traffic
There's this propaganda that since Google owns Blogger, they tend to favor Blogger accounts. I won't say that this is illogical, but from my experience, there's no such favoritism.
I've heard as many stories of getting indexed fast and ranking high in search engines from both Wordpress and Blogger users. As long as the content is good, the spiders will come.
When you post in Blogger, you can only “ping” a limited amount of sites, whereas with Wordpress on your own domain you can ping as many blog directories as you want, and start getting more traffic.
As a conclusion, I would say that Wordpress is only slightly ahead in terms of optimization for search engines, and building large amounts of traffic.
6) Money-Making Potential
There's no doubt that it's easier to get started with Google Adsense if you have a Blogger account. In fact you can now apply for Adsense from within a Blogger account. Not entirely surprising considering the fact that both are owned by the same company.
With Wordpress, it can get tricky. The default installation is not enough. You'll need a couple of plugins and even a better theme to really maximize the Adsense potential. However, this seems to be getting easier and there's even "Adsense revenue sharing" plugins around that allow you to share ad revenue with other contributors and writers for your blog.
When you start using Wordpress to build your Adsense websites, you’ll soon discover what I mean. It’s something you need to experience for yourself. I can tell you one thing though – when you go Wordpress, you don’t go back.
About This Author Gobala Krishnan helps beginners and experienced marketers master Wordpress and blogging for creating micro-niche websites that produce massive profits. Get started now by reading his free reports as Easy Word Press
In my last post i have given a javascript code to create a drop down menu in blog/sites. The same code i've implemented in my blogroll.( See right side bar of this blog for working example of it) But the problem with the code is that it can't be implemented in blogger beta, as blogger beta does not give the complette freedom to modify the template code.
So here is small code to create a drop down menu in blogger beta.
Step 1. Copy the code below in a note pad and replace link1.com, link2.com etc. with the destination page, and link1 and link2 with the name of the respective destination. If you want to insert more links just copy and paste <option value="http://link1.com"/>link1<option value="http://link2.com"/>link2 before </select> tag. after doing this your code is ready.
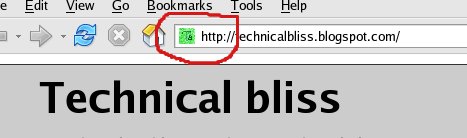
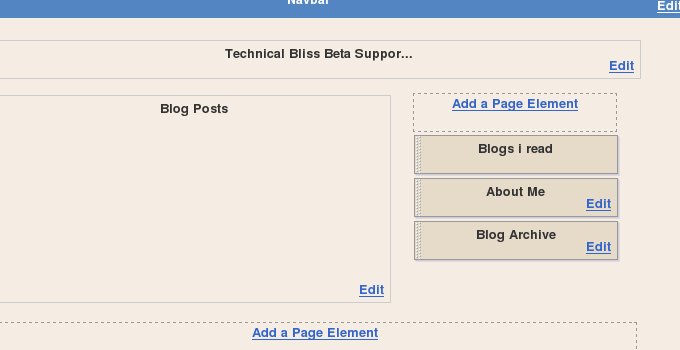
Step 2. Log on to your blogger beta account and in blog settings go to template tab and then click "Page element" tab
(Click images to enlarge them)
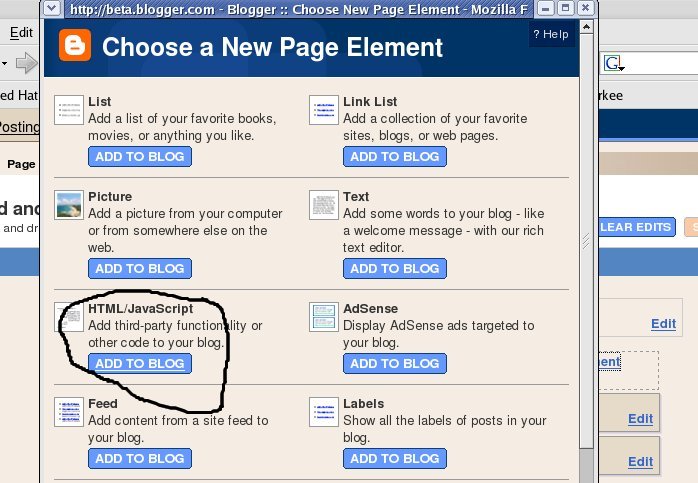
Now click "Add a page element" and then choose HTML/Javascript page element
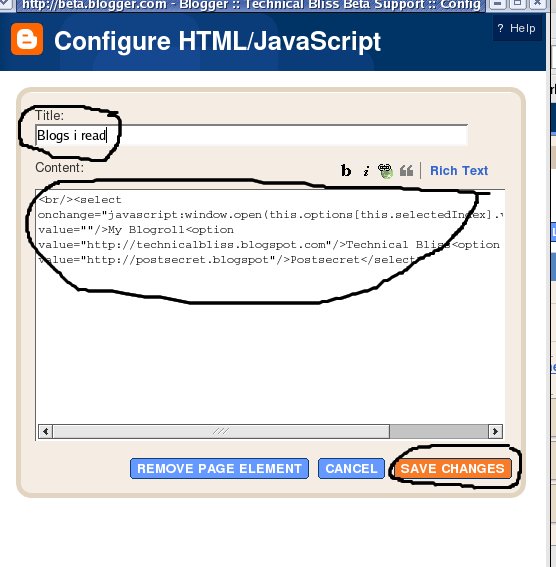
Now enter the title what ever you like. (i've entered Blogs i read) and in palce of content add the code which you have copied and modified in the notepad in step 1.
Now click "save changes" Now you can see a new element is added in your layout.( see the image below)
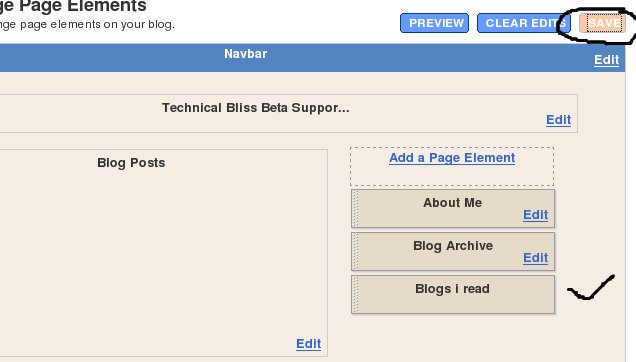
Now drag and drop the element ( i.e Blogs i read) where ever you want it to be. ( Like i've put it below my blog archive)
Click "save" button and work is done. your drop down menu will look like this.
If you want to see the working example of the visit my other blog at beta blogger here. If you think that this method has been helpful to you then plz link my blog on your blog. (Or place my link in you blogroll). If you have any problem, feel free to ask me...
If you want to create a drop down menu in your blog or site, here is a small javascript code. (Check out my blogroll section for a working example of this code)
While placing this code on your blog/site you have to follow two steps.
Step 1: Copy the following code in the section where you want to create the drop down menu
In the above code you can customize the links by palcing your link URL in place of link1.com link2.com and link3.com
also if you dont want to open your link in new window you can simply remove target="newwin" i.e instead of line <option selected value="http://link1.com/" target="newwin">link1just write <option selected value="http://link1.com/">link1 The lable dispayed is My Blogroll. Change that in code if you want something else there.
Step 2: Place the following part of code at the end of your blog/site template just before the <html> tag.
/// You may define additional text arrays if you have multiple drop downs: var thetext2=new Array() thetext2[0]="description of site 1" thetext2[1]="description of site 2" thetext2[2]="description of site 3" thetext2[3]=""
// Now, see 2) below for final customization step
function displaydesc(which, descriptionarray, container){ if (document.getElementById) document.getElementById(container).innerHTML=descriptionarray[which.selectedIndex] }
function jumptolink(what){ var selectedopt=what.options[what.selectedIndex] if (document.getElementById && selectedopt.getAttribute("target")=="newwin") window.open(selectedopt.value) else window.location=selectedopt.value }
In the above code look for the text thetext2[0]="description of site 1" you can enter a brief discription of site here.
To add more sites in drop down menu 1) Add line <option selected value="http://link.com/" target="newwin">link</option> in code 1
2) Add line thetext2[?]="description of site 3" in code 2 and replace ? by next no.
If you have any problem regarding this code feel free to comment here.. i will try my best to solve your problem
P.S. As my blog visitors have pointed out, the above code will not work with blogger beta. To implement a drop down menu in blogger beta, see the related post here this code is taken from dynamicdrive
Addthis is a service to integrate all the social bookmarking services together. With the AddThis Web Buttons, web publishers make it easier for their visitors to collect content from their websites or blogs, and send it to their favorite destinations, including social media services.
This button looks like
(click it)
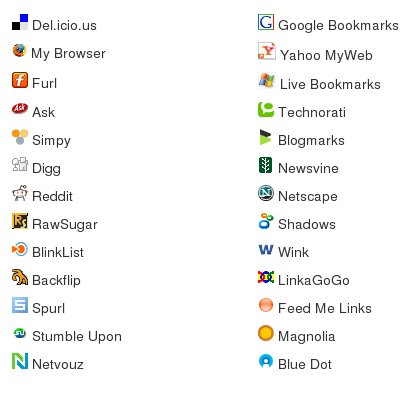
Now you can help you page visitors to bookmark their page in following 26 bookmarking services.
Tech-scope was a very popular blog with thousand of hits daily. Now check it out. So what went wrong? Read the complete story here.
So if you are a regular blogger then dont forget to backup your blog. After all we beleive in Murphy's Law.
So here is a small tutorial about backing up the entire blog (for blogspot users)
Blogger does not have an export or download function. However, you can use the following instructions to create a single file with all your posts which you may publish and then copy to your own computer for use as desired. Note: If you intend to continue using your blog, please save a copy of your existing template in a file on your computer as you will need to have it at hand after this process is completed.
Log into your Blogger account, then switch into template-editing mode.
Make a copy of your current template; you will be replacing your Blogger template with the single page template in Step 3, but you probably don't want to lose your original template.
Replace your Blogger template with the following (note: you must remove the indentation from the following lines when pasting into your Blogger template):
Optional: If you are using our commenting system, you can choose to export comments along with the posts. If you want to do this, add the following code to your template, just above the tag:
In Settings | Publishing change your Blog Filename to a different filename; this will prevent you from overwriting your main index file. Make a note of your current Blog Filename so you can restore the setting after finishing. [Note: This only applies to users publishing via FTP. Free BlogSpot users will need to overwrite their existing blog page, but it will be replaced as soon as the blog is republished with the original template.]
In Settings | Formatting, set your blog to display all of your posts on the main index page. There is no explicit setting for this; instead, you should change the number of days displayed on your front page (Show N days' posts on main page) higher than the number of days that you have been blogging.
In Settings | Formatting set Date/Time Format to the format MM/DD/YYYY HH:MM:SS AM|PM. (Note: the format will not look like this in the menu; instead it will be the current time, formatted.) Make a note of your current setting so you can restore it after finishing.
Also in Settings | Formatting set Convert Line Breaks to No.
In Settings | Archiving, set Archive Frequency to No Archive. This will prevent your archives from being overwritten with the new template.
Republish your blog; you will end up with a single file with all of your posts, formatted using the above template, at the location specified in your Settings. Open this file in your web browser and save the file to your local hard drive.
Restore the previous settings (Blog filename, archive frequency, timestamp, etc.) in your blog and replace the temporary template with your saved copy. Publish the blog and view the page to check that everything is correct.
The complete help on the topic can be found ate Blogger Help
Disclamer: All the tricks, tips and hacks provided on this blog are correct up our knowledge. We dont take any legal or moral responsibilty of the damage arising due to use of information provided here.